
    
    
Themed Birthday Cakes
BEN 10 CAKE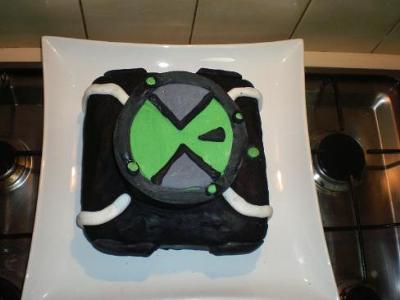
This is easy to
make, just make 2
sponge cakes, one square and a small round one.
Cover both the cakes with black
fondant icing, then roll
out a round circle with white fondant icing, and place it on the top of the
small round cake. Then use some food
colouring to make white fandant icing green.
and mix some a little bit of
black with the white fondant to get the
grey. Roll 4 round strips with the white fondant for the
watch grips The decorating is easy, just have the watch there and
copy design. The icing is like playing with play doh. so
get the kids involved they will love it..
You could even get some black
liquorice strips to make the watch band to
go on the sides. Have Fun !!
HIGH SCHOOL MUSICAL CAKE
Bake a sheet cake the size that you need. 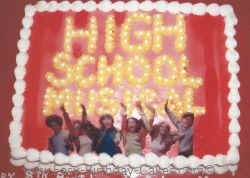
Ice the cake in white buttercream icing making sure it is nice and smooth.
Cover the cake with red coloured ready roll icing.
Get a icing pen and draw on the word's " HIGH SCHOOL MUSICAL "
Then pipe over the pen marking with yellow icing and using a star tip to do the words High
School Musical.
You can use either white tic tacs or gold/sliver edible pearls for the light bulbs spacing
them on the yellow letters pushing them slightly into the icing.
Take a picture of the kids from a magzine or download and print to the size that you need
and cut it out.
Then laminate it on both sides leaving a small laminated edge around the entire picture.
Then lay the picture at the bottom edge of the cake top with the hands etending over the
bottom fo the words ("High School Musical").
To Finish use a star tip and white icing make a shell border around the top and the bottom
edge of the sides fo the cake.
Your child will think your the best parent ever !!!!!!!!!!!!!!!!!!
PIRATE SHIP CAKE
INGREDIENTS:
2 baked 9" or 10" round cakes
3 to 4 cups chocolate icing
Decorations:
Chocolate fingers
Milk chocolate rolls
Several pieces Edible rice paper
3 10" wooden skewers
Malteasers  
Rolo candies
Gold wrapped chocolate money
Plastic pirate figures, washed thoroughly
1. Cut the cakes in half and layer them, rounded sides all facing the same direction,
adding a thin coat of chocolate icing between the layers.
2. Trim the bottom curves of the cakes slightly to help them sit flat, then turn the cakes
upright, as shown.
(Tip: If necessary, wrap the cakes in plastic and chill
in the freezer to make them firmer. Also, two drinking straws stuck through the four
layers of cake will help keep them together.)
3. Cover with the chocolate icing, then create planking lines along the hull chocolate
fingers. Chill at least one hour to firm the icing.
4. Press the chocolate rolls into both sides of the ship for cannons.
5. Cut sails from the rice paper, then slip them onto the skewers and set the masts in
place.
6. Add Malteaser cannonballs, plenty of Rolo gold booty, Gold wrapped chocolate money,
then station a few pirates to keep watch.
7. For safety, place the candles in the chocolate roll cannons, far from the paper sails.
Also, make sure that the surface on which the cake rests is impervious to wax, as the
burning candles will drip.
Treasure Chest Cake
Prep Time: 50 minutes (Ready in 3 hours)
Makes 25 Servings
Ingredients
CAKE:
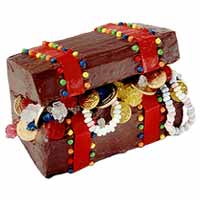
Sponge Cake Mix
1 cup water
1/3 cup oil
3 eggs
ICING:
Milk Chocolate Icing
DECORATIONS:
Fruit strips
Edible treasures, such as chocolate coins, Rolo candies, chocolate almonds
Directions
Heat oven to 350°F. Grease and flour 9x5 inch loaf pan. In large bowl, combine all cake
ingredients; beat at low speed until moistened. Beat 2 minutes at medium speed. Pour
batter into greased and floured pan.
Bake at 350°F. for 50 to 60 minutes or until toothpick inserted in center comes out
clean. Cool cake in pan for 15 minutes. Remove cake from pan; place on wire rack. Cool 1
hour or until completely cooled.
Cut off top of cake, leaving base of treasure chest about 1 3/4 inches high. Trim 1/2 inch
off 1 long side of cut off top of cake to form chest lid; crumble cut off piece of cake
and set aside for later use. Place "chest base" on platter or foil covered
cardboard; frost cake. Place candies on front edge of "chest base."
Cover trimmed side of "chest lid" with a small amount of chocolate icing. Place
"chest lid" on top of "chest base", lining it up with back long side
of "chest base." ice the remaining surfaces of "chest lid." With fork
or pastry comb, create wood grain affect or you could use chocolate fingers !!
Attach fruit strips on edges and across center of "chest." Sprinkle reserved
cake crumbs around cake. Arrange candies on platter around cake.
PRINCESS CAKE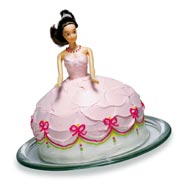
RECIPE INGREDIENTS:
2 baked 9-inch round cakes
1 baked dome cake (baked in a 2 1/2-quart bowl)
4 cups white frosting
Red food coloring
Gel icing
Cake doll
Decorating The Cake
1. Stack and lightly ice the two round cakes and then
the dome cake (flat side down) on a serving plate to form a skirt.
2. After the icing on the cake firms up (you may have to chill the cake for a while), tint
the remaining icing with food coloring and spread it on the upper two thirds of the skirt.
3. Pipe on decorative gel icing trim. Then press the waist of the cake doll into the
center of the cake.
4. Dress her in a icing bodice, same colour as dress and she's ready to make her debut at
the party. Serves 16 to 18.
PRINCESS CASTLE CAKE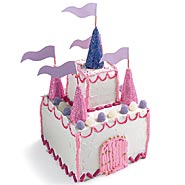
RECIPE INGREDIENTS:
5 baked 8" square cakes
5 to 7 cups white icing
5 icecream cones
Purple and pink edible glitter
1/2 cup pink icing
White and purple gumdrops
Plenty Pink Sweets
Pink or red gel icing 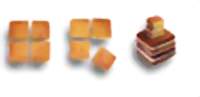
Mini candy hearts
Red sprinkles
Colored paper
5 toothpicks
Decorating The Cake
1. Cut one cake into four equal pieces and arrange
three of them on the top the four whole cakes, as shown, securing with icing. (Tip: Cut up
the extra cake piece for nibblers.)
2. Frost the castle and cones with the white icing, then sprinkle the cones with edible
glitter or hundreds and thousands and set them on the castle.
3. With a pastry bag, create pink icing corner pillars and a door.
4. Set the gumdrops around the castle ledge, then add decorative loops with piped icing
bag and the mini candy hearts.
5. Finally, add the sprinkles around the top of the castle and top the cone turrets with
flags cut from the colored paper ans stick to the toothpicks with a little icing.
Dinosaur Cake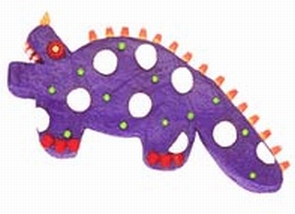
RECIPE INGREDIENTS:
2 baked 8-inch round cakes
Icing for frosting or ready to roll icing
Marzipan and jam ( if using ready to roll icing )
Purple food coloring
Marsh Mallows
Sweets for decorate dinosaur's ridged back
Jelly Tots
Decorating The Cake
Cut both cooled cake rounds into the appropriate dinosaur shapes as
shown in the diagram.
Referring to the finished cake above, angle the small pieces to form
the dinosaur's mouth and the long slivers to make the tail. Ice the whole cake with purple
coloured icing sugar or marzipan and cover with purple coloured ready to roll icing. Jelly
tots ideal for creating the effect of a dinosaur's ridged back, stick on using a little
frosting icing. Use marsh mallows for the dinosaur's spots if you have frosted the cake or
cut out some circles using the white ready to roll icing before colouring.
POWER RANGERS CAKE
RECIPE INGREDIENTS: 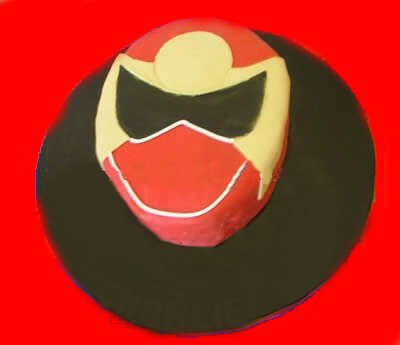
2 baked 8-inch oval cakes
Ready to roll icing
Marzipan
jam
Red, Yellow and Black food coloring (if Red Ranger)
Piping Icing
Decorating The Cake
Spread jam onto top of one of the oval cakes, then place other oval
cake on top.
Cover both cakes with jam and marzipan, colour half of your ready to
roll icing red, then with the other half divide that into two and colour one half back and
the other yellow. Roll out red icing and cover the cake, then roll yellow icing and cut
out design as on above cake, then stick onto the cake using some jam. Also roll out the
back icing and cut to the design on the above cake and stick using jam, finish the cake
with piped icing around the bottom of the black visor and around chin.
|